The last 6 weeks of yearbook production are busy! You have spent the entire school year gathering and creating content, but this time is especially condensed and involves making sure the book is ready for printing.
This article explores all the steps that lead up to printing your yearbook, and how your hard work makes it to the glossy pages.
Be Print Ready
Yearbooks have a lot of components, which makes them prone to errors. Here are some things to check before printing so you don’t encounter errors when it’s too late.
Colour
Images that are vibrant onscreen may look lacklustre or have discrepancies in print if the colour mode isn’t correct. Digital and print media require different colour modes: RGB for web and CMYK for print.
RGB is an additive colour system, where primary colours are mixed together to produce a wide spectrum of shades. The more colours used, the lighter the image will be. Without any intensity, each colour will appear black. Differing intensities of each colour create the hue of a colour.
CMYK is a subtractive colour model, where the more colours added, the darker the image. Printing inks have their limitations, and some colours that can be created onscreen are impossible to recreate using printing inks.
To ensure your image colours are right for printing, check that your files are all set to CMYK mode.
Resolution
In the printing process, DPI (dots per inch) is what determines the quality and resolution of your images. Aiming for at least 300 DPI at the size you wish to print will give you the best results.
As DPI isn’t always easy to calculate, the image file size can give you a good indication of whether you’re on track. Ideally, all photos should be above 800 KB, and those under 500 KB will not be usable. Aim for images above 1 MB or for full-page images, aim for 5 MB.
Page Guidelines
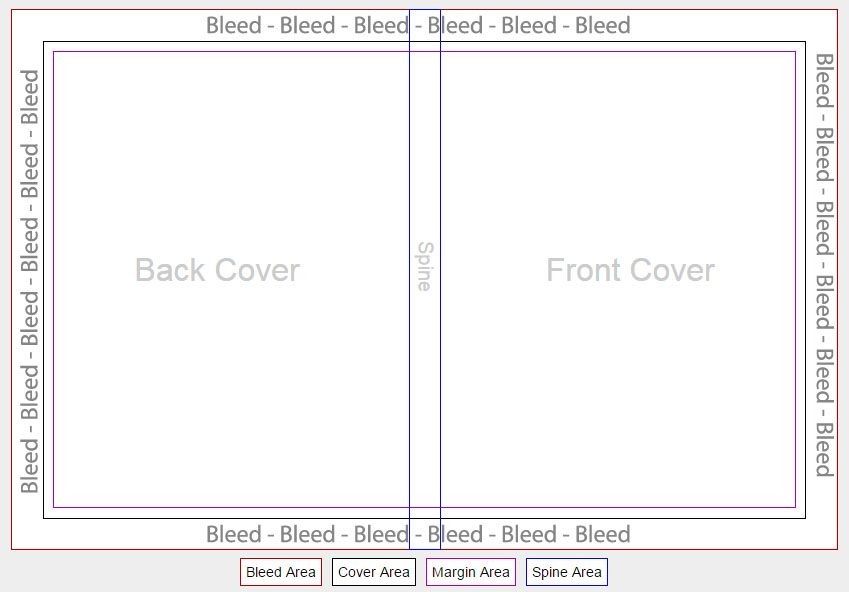
If your page content doesn’t follow guidelines, important content may be cut off during the printing process. Ensure that all backgrounds are brought out to the bleed line to avoid an unprinted border around the pages. Double-check that your content doesn’t exceed the trim line and that all articles and images are in the page safety zone.
Yearbook Printing Proofs
As a Spacific Creative client, you will be provided with proofs to ensure the printing process goes ahead smoothly. This can be either online or in printed hardcopy depending on your preference. Proofs provide you with a better idea of what your yearbook will look like once printed. Additional corrections can then be marked-up on the proofs and fixed before print.
Yearbook Printing Options
2-Page vs. 4-Page Cover
An important design consideration involves choosing between a 2-page or 4-page cover. A 2-page cover prints just the outside of your book’s front and back. A 4-page cover lets you continue your cover design through to the inside page at the front and back of the yearbook.
Yearbook Binding
After printing the yearbook pages, it is time to bind them together. Saddle-stitch and PUR binding are the most common for yearbooks, and your budget and book-length will likely determine your choice.
Saddle-stitching uses folded sheets that are gathered together, one inside the other, and stapled. This means that your page extent must be a multiple of 4. Saddle-stitch also limits the maximum yearbook length to 60-80 pages. This cheaper binding option is great for shorter and more informal publications.
PUR binding is a form of perfect binding that uses glue at the spine to hold the pages together. The other three sides of the yearbook are then trimmed for clean ‘perfect’ edges. This binding is best on books with over 48 pages, which results in a ‘square’ spine. This square spine is good real estate for the school name and year, making it easy to identify on a bookshelf. The page extent must be a multiple of 2, but for larger books, it is more economical to have sections of 8 or 16.
The Spacific Creative Printing Schedule
After deciding on a delivery date, Spacific Creative works backwards to establish the yearbook schedule. This includes milestone dates for sending initial material and for all proof-checking stages.
The last few weeks includes making final corrections and signing off for print. From here, your yearbook will take another 2 weeks to be printed, bound and delivered.
If you are designing your own yearbook independently and just need it printed, reach out to Spacific Creative! We offer a Print Me service that may be just what your school needs.